LISTENING TO KATRINA - PREPAREDNESS
PROJECTS
THE CONTENTS OF THIS PAGE ARE RATED 'G' AND ARE
SUITABLE FOR ALL AUDIENCES

LIFE GOES ON BAG - REDUNDANT COPY THEORY
PRINT
THIS PAGE
Workbook
page: None
Listening to Katrina companion
page: HYST - Documents
Now that we have your USB Flash Drive ready to go, I am going to show you how to use your External Hard Drive to make redundant copies of your data. The tech savvy might ask, "Don't you mean 'backups'?", and the answer to that question is, "NO! *NEVER* MAKE A BACKUP!"
I make my bread and butter with computers. After Katrina, despite the fact that many of our client's offices were under water, we were able to bring them all back online in very short order after the storm. Despite the fact that we had entire server racks destroyed, not a single client lost vital data. There are a number of reasons for that - all of them involving advanced planning, and the fact that none of our clients make backups. They have all been taught to make redundant copies.
A backup is a single copy of a file or a set of files. Let's say that you have an external hard drive that you use as your backup device. Many people do this at home and a lot of small businesses do it too. They plug the external hard drive into their server, set a scheduled backup routine, and that runs every night. If the server (or other backed-up computer) dies for some reason, the data is saved on the backup device. This works very nicely for that scenario. Most of the time, however, that isn't the scenario that plays out.
Let's say that the computer being backed up to this device gets a virus, or is hit by a hacker, or is discombobulated by cosmic rays. (Discombobulated is a highly technical term that is akin to hiddley-piddley, but worse.) So, all your data is corrupt on the computer. That night, the backup routine runs, and backs up the computer. You come in the next day and find everything hiddley-piddley, and you call the tech. The tech (that's me) comes in and says, "Oh! This is completely discombobulated! We will have to restore from the backup!"
You say, "Here is the backup, oh Wise and Mighty Sorcerer of Technology!"
Of course the problem is that the backup that ran last night is a backup of corrupted data. The tech (that's me) finds this out pretty quickly and says, "This one is no good! Give me the redundant copy from the day before."
Unfortunately, you say, "But... But... That's the backup... I don't have a redundant copy!"
The Mighty Sorcerer of Technology then has to go talk to The King (who is your boss), and The King gets Powerfully Angry, orders the guards to seize you, and tells you to consider your lack of foresight on the Tree of Woe.
 That kind of thing can really ruin your weekend, not to mention put you way
behind on your current projects because all your data is gone. The
answer to this problem is to make and keep redundant copies. That
means that you keep several redundant copies of your data over time so that
it is possible to retrieve data from various times in history. Here is
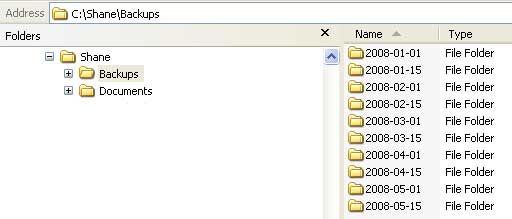
an example of such a setup. Under the 'Backups' folder there are
individual folders named with a date format that keeps them in logical
order. The data copy for that date is inside that folder.
That kind of thing can really ruin your weekend, not to mention put you way
behind on your current projects because all your data is gone. The
answer to this problem is to make and keep redundant copies. That
means that you keep several redundant copies of your data over time so that
it is possible to retrieve data from various times in history. Here is
an example of such a setup. Under the 'Backups' folder there are
individual folders named with a date format that keeps them in logical
order. The data copy for that date is inside that folder.
The model shown is a two week copy interval. The model you use will depend on your needs and how frequently you update the data on your laptop. The more work you do, the more frequent these copies should be taken. Let's go ahead and actually set up your External Hard Drive, and we'll discuss the theory as we go along.
You should place the drive on a stable, level surface. While the drive is very durable while un-powered, once you switch it on it becomes quite fragile because the internal plates spin at high rates of speed and the light metal fingers (heads) that read and write the data are frail. If your drive hits the floor while it is spinning, it will probably die. You really don't want to set the drive up on an old plastic TV tray or run the cords across an open space where your kids or pets may run into them and knock the unit off the table. When you do power it up, do not move it, bump it, or dump Coke in it. Don't drop heavy objects on the table upon which it sits. Be very nice to it and it will work and last for a long time. I have personally killed drives and lost data by not following these cautions.
Using your External Hard Drive is exactly like using your USB Flash Drive, only on a much grander scale. You should have the drive itself, which is inside some kind of enclosure - which is just a fancy box of some kind. Depending on which type you have, there may or may not be an on/off switch. If there is, make sure it is off and start connecting the wires. Read the instructions that came with the drive to avoid any confusion. Again, depending on type, you may have an external power cord. If so, attach that and plug it into a wall socket. If you don't have an external power source, then you will have one or two USB connectors that will supply power - and connect the unit to the computer. Go ahead and plug the USB cables in and then connect them to your computer. If you have an on/off switch, switch it to ON at this time.
Just like with your USB Flash Drive, the Windows operating system may flash several windows at you talking about how it is installing drivers and configuring the device. Eventually, though, it will tell you, "Your new hardware is ready to use." This is true for Windows XP and later. If you have Windows 98 or Windows 95 you may need to install a driver manually, but that is beyond the scope of this document. If you have a modern computer, you should be able to plug it in and it should work.
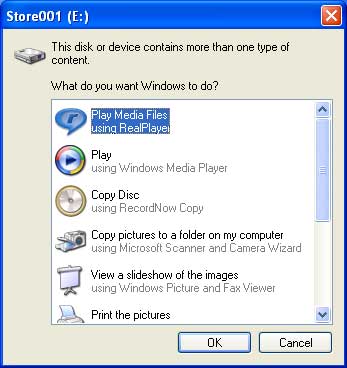
You may also get a popup window asking you what you want Windows to do with the content on the disk. I do not use this wizard because I find it cumbersome, so I always just click CANCEL.
If you have bought a pre-assembled drive, then it will be ready to use. If you bought a case and installed your own blank hard drive, then you will need to create a drive partition and format the drive before it is ready for use. If you start Windows Explorer, and you can see your external drive (which should be the same drive letter that your USB Flash Drive was) then you do not have to do this. If the drive isn't in the drive list in Windows Explorer then follow the instructions here before continuing.
Now you have a nice new drive, and if you right click on it and select PROPERTIES, you will get an information screen showing you the size of the drive. Close that window and let's talk about how to use your new technology.
If you have a virgin drive in front of you, consider using TrueCrypt to encrypt the entire drive. This will further safeguard your data should you external hard drive ever be lost or stolen. To anyone without the proper password, it will be nothing but a worthless box. In order to do this, read the relevant section in the TrueCrypt User's Guide. If you should chose to do this, be aware that it will take some time for TrueCrypt to convert the drive - my 500 GB drive took 9 hours - so plan to let the process run over night. Once complete, you can continue here - or if you chose not to encrypt the drive, then you can continue now.
 The
first thing we should talk about is the layout of the folder structure of
the drive itself. While there is a lot of automated backup software on
the market, I'm going to teach you how to do manual file copies so that
you are in total control of your data stores. While it is a
little more complex and a little more difficult, if you can toast and butter
a muffin, you ought to be able to do this.
The
first thing we should talk about is the layout of the folder structure of
the drive itself. While there is a lot of automated backup software on
the market, I'm going to teach you how to do manual file copies so that
you are in total control of your data stores. While it is a
little more complex and a little more difficult, if you can toast and butter
a muffin, you ought to be able to do this.
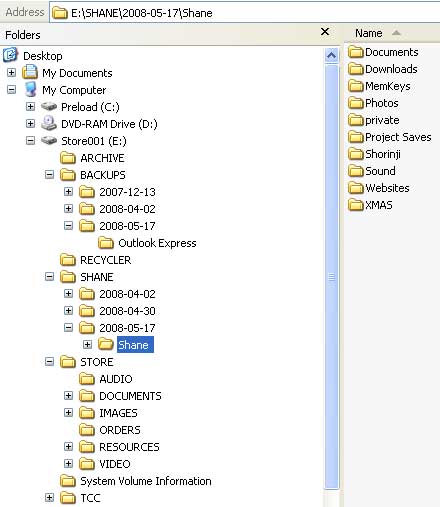
The image at left is a screen shot of the folder structure of my primary External Hard Drive. If you haven't already done so, you can name your drive by right clicking on the drive letter - (E:) in this example - and selecting RENAME. I use logical names, so Store001 is my primary External Store. Store002 is used for other things. This allows me to identify the drives through Windows Explorer when I have identical units on the table. If you only have one unit, you won't have that need.
As you can see, I have created several folders inside the Store. ARCHIVE contains the initial system state of my computer as well as some very old data copies. BACKUPS contains individual folders in which I create specific copies of data. I use a logical date sequence name for the folder names inside BACKUP so that they list in order. The first one shown is December 13, 2007, the logical name for which is 2007-12-13. I have done this for many years, and I have never found a better method.
You can see the drilldown of Outlook Express in the 2008-05-17 folder. That's a copy of my email on that date - and backing up your email is something I am going to show you how to do - although there is an easier method on the next page. The RECYCLER folder (as well as the System Volume Information folder) are created by Windows when the drive is initially mounted. You should not alter or delete these folders.
The SHANE folder is (for me) the folder we created as the 'root' folder under which we store things on the C:\ drive on our laptops. I create this folder in the External Hard Drive so that I have a place to make redundant copies of my SHANE folder from the C:\ drive. As you can see, I follow the same logical date sequence naming convention.
The
STORE folder is a folder that only exists on the External Hard Drive.
It contains things like movies, music, and other non-critical files that I
don't want cluttering up my C:\ drive and do not require safeguarding.
If I lose the drive, then I lose all of that stuff - but it isn't anything
that I can't easily replace. The TCC folder is a folder I use for
keeping copies of projects for my company - which is one of the primary
reasons that I took the time to encrypt the drive. I don't want anyone
else accessing client data.
As you can see in the image at right, the Shane folder in SHANE\2008-05-17 has the exact same folder structure as my C:\Shane because the Shane folder on my External Hard Drive is a duplicate copy of C:\Shane. The Shane folder is replicated in each of the dated folders under SHANE, and if I want to go look at the Shane folder as it existed on April 2 or April 30 of 2008, I can do so.
This is only an example, and my actual data redundancy goes back several years. This is only an example, and I will teach you how to plan and manage your redundancy later on this page.
The first order of business is to go ahead and create the folder structure inside your External Hard Drive now. Be sure to think about it carefully. You can change it later if you need to, but it should suit your needs. If you are unsure exactly what you should do, then replicate my model; it is fairly generic and works well.
Once you have the initial folders configured, add a logical date folder under your 'root' name - SHANE in this example. If today's date is May 17, 2008, then the logical date name is 2008-05-17. Once you have it, let's go ahead and make a copy of the 'root' folder of your (C:) drive.
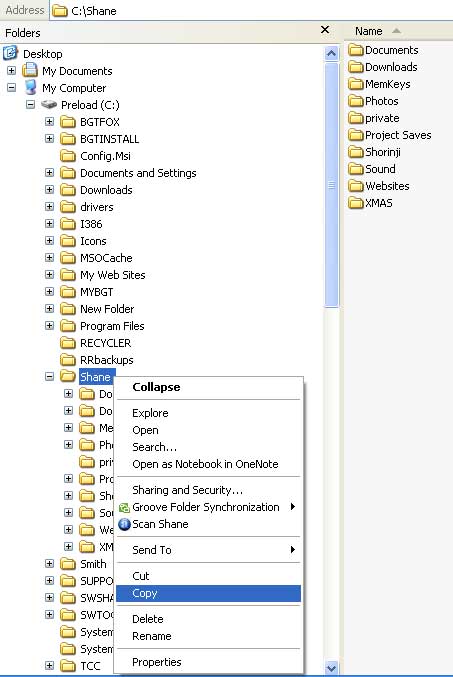
Using Windows Explorer, locate your 'root' folder. If you have been following my model, it will be under My Computer in the (C:) drive. The example is Shane. Right click on the folder, and select COPY from the menu.
As a bit of trivia, this is known as the Context Menu.
Now go over to your External Hard Drive in Windows Explorer, find the logical date folder that you just created, right click on it and select PASTE from the context menu.
The file copy will begin. Depending on how much data is in your root folder, this will take a few minutes. While you are waiting, take the time to kiss your wife, kiss your kids, go outside and smell some flowers, or otherwise do something that gets you out from in front of this magic box for a few minutes!
Once you come back from your Joy Break, let's talk about some other things that you may want to copy redundantly. I keep a very large store of correspondence in my email program. I use Outlook Express because it works fairly well, is free, and it comes pre-installed with Windows. If you do not use Outlook Express, then you will have to find out where your email files are stored in order to copy them. I am going to give you exact instructions for Outlook Express.
If you use a web-based email instead of a mail client, then you will not need to make copies of your email - they are not stored on your computer. What this means is that if you open an internet browser and go to a website to read your mail, then you won't have to do this.
I am actually going to teach you an easier method to do this, but I want you to develop the skills to do this manually on your own. It will help you understand what happens when you use the easy method later. If you aren't interested in learning this, then skip ahead to the next page.
Before you can make a copy, you should close your email program.
The Outlook Express mail store is normally contained on drive (C:) under \Documents and Settings. Find that and then look for your user name. In this example, it's 'Shane'.
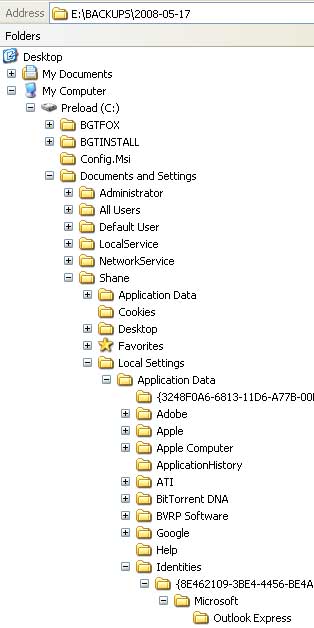 Continue
to drill down into your profile folder (the one that's your name), and into
\Local Settings, then \Application Data, then \Identities, then a folder
whose name is a long string of digits, then \Microsoft. You will
finally see the Outlook Express folder. Right click it, select COPY
from the context menu, and PASTE it into the logical date folder you should
have already created in the BACKUP folder on your External Hard drive.
Continue
to drill down into your profile folder (the one that's your name), and into
\Local Settings, then \Application Data, then \Identities, then a folder
whose name is a long string of digits, then \Microsoft. You will
finally see the Outlook Express folder. Right click it, select COPY
from the context menu, and PASTE it into the logical date folder you should
have already created in the BACKUP folder on your External Hard drive.
I am going to recommend that you make redundant copies of other things in various places on other pages. For now, though, I am not going to give you a list. I'm not so much interested in telling you exactly what to do. I'm more interested that you learn how to do this so that you will develop the skills to do the things you need to do on your own. It's more important that you can think for yourself than it is for you to be able to follow instructions.
If you can already do all this stuff, and you're getting aggravated with me that I'm talking down to you, remember that this is written for people who are not computer savvy.
On the next page I'm going to talk about putting all your new-learned skills to use maintaining and protecting your data wealth using a few simple tools. We'll also talk about some theory as it relates to this context. You're almost done, so stick with it!
If you are going to stop here and continue later, you should remove your External Hard Drive from the computer and power it down. You must follow the same procedure you use to remove your USB Flash Drive. The first and easiest method is to simply shut the computer down. That will release the External Hard Drive and insure that it is safe to remove. To remove it without shutting down the computer, you must find the SAFELY REMOVE HARDWARE icon in your system tray. That's the little box with a bunch of icons in it at the bottom right of your screen. The icon looks like a tiny green arrow over a grey box that may or may not be meant to represent a hard drive. When you click that icon, you will be given some options. Depending on the version of the operating system, these options can vary. Follow the same method you use to remove your USB Flash Drive and you'll be OK. Wait for the drive to stop spinning before you move it - which shouldn't take longer than a few seconds.
Shane